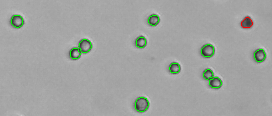
Trypan Blue Viability: Viability is a measure of the metabolic state of a cell population which is indicative of the potential for growth. Trypan blue viability is a dye exclusion method that utilizes membrane integrity to identify dead cells. Trypan blue dye is unable to penetrate healthy cells, so they remain unstained. Dead cells have a compromised cell membrane that is permeable to the trypan blue dye. Dead cells are stained blue and display as dark cells in the Cellometer software with bright field imaging. Within 30 seconds, the Cellometer Auto T4 instrument counts both live cells and dead cells and calculates % viability for a cell sample.
Trypan Blue Viability Using the Auto T4
A. Preparing Your Cell Sample:
1. A cell concentration of 2.5 x 10<5 to 1.0 x 10<7 cells/mL is recommended
2. Invert the tube containing cells ten times and pipette up and down ten times to generate a homogeneous cell sample and reduce cell clumps. Do not shake or vortex the sample! This will generate bubbles.
3. For viability measurement, stain cells by combining 50 µl of cell sample with 50 µl of a 0.2% trypan blue staining solution (for a final concentration of 0.1% trypan blue). Gently mix by pipetting up and down ten times.
B. Analyzing a Sample for Concentration and Trypan Blue Viability:
1. Peel plastic off of both sides of the Cellometer slide. (for SD100 slides, the plastic has already been removed)
2. Place cell counting chamber on a fresh Kimwipe
3. Label slide chamber #1 and chamber #2 on the white margin of the chamber. Avoid touching the clear portion of the counting chamber.
4. Load 20 µl of mixed cell sample into the Cellometer counting chamber (see page 20 of the Auto T4 User Manual).
5. Insert the loaded chamber into the Auto T4 sample slot and gently push the slide to the stop.
6. Click the Display Image button at the top left of the screen.
7. Slowly turn the “Focus Knob” until the best cell counting focus is achieved. Live cells have a bright center and a clearly defined edge (also refer to the Cellometer Focus Guide)
8. Check the Test Viability box if you have stained cells with trypan blue for viability
9. Select the Cell Type Wizard from the Cell Type drop-down menu to create a new cell type.
10. Check Live Image and click Continue
11.. Enter a new Cell Type Name and Detailed Description (optional) and click Save.
12. After saving the new cell type, enter the Sample ID and Dilution factor. For undiluted samples (cell counting only), the Dilution factor is 1. If cells were stained with trypan blue at the recommended 1:1 dilution for viability determination, the Dilution factor is 2.
13. Click the Count button at the top left of the screen. When counting is complete, the software will display the Live / Dead Cell Count, Total Cell Count, Mean Diameter, % Viability, Live Cell Concentration, and Total Cell Concentration in the table at the bottom left of the screen.
14. If the Total Cell Count is < 100, the cell sample is too dilute. Analyze a more concentrated sample using the newly-created cell type from the drop-down menu. If the Total Cell Count is > 3,000, dilute the original cell sample in the appropriate media or PBS and analyze using the newly-created cell type from the drop-down menu.
15. Check the Counted box and click 1 (for image 1 of 4) at the right hand side of the screen.
16. Live cells with a bright center should be circled in green. Dead cells which are dark should be circled in red. Individual cells within clumps or doublets should be circled. If it appears that live / dead cells and / or cell clumps are not being analyzed correctly, please contact Nexcelom Technical Support at support@nexcelom.com or 978-327-5340. A Nexcelom Technical Support Specialist is available from 8:30 am to 5 pm EST for assistance with optimization of software settings.
Download Trypan Blue Instructions for the Auto T4: Trypan Blue Viability with Auto T4 June 2012


Leave A Comment